
Adding texture support
- Nov 11, 2014
- 3 min read
Purpose:
The assignment was to
Create a TextureBuilder.exe that processes the input image assets and outputs them into .dds format for game to use at runtime.
Support loading of UVs in vertex shader and fragment shader.
Texture:
Texture in terms of Graphics is an image stored as 2D array in memory. Think of it like any cloth that you want to cover it or in more appropriate terms MAP IT on a mesh in game. Like the one below,

And in order to actually map it to a 3D mesh we need to do something called UV mapping. In order to even start doing UV mapping we need to know the vertex information. In the below image the vertices 1,2,3,4 on a 3D cube mesh are the ones where the mapping needs to be done on.
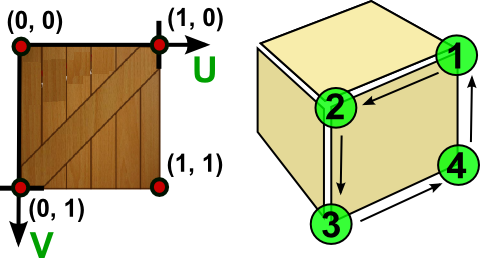
U is the normalized length of the texture in x-axis and V is the normalized length in y-axis. UV is 0,0 in top left of a texture and increases up to 1 in respective direction as show in the image above. Graphics card takes a texture and UV value for each vertex of a mesh. It then interpolates these values to every pixel on the final mesh. Similar to color interpolation, the value of UVs are interpolated. In order to get a pixel color on a texture with given UV value we need something called a sampler. A sampler is function that takes in an absolute value of UV and returns the pixel color on the texture at that UV point. Final rendering of 3D mesh after the texture is applied to the cube looks like below,

Process or Flow:
For this I had to modify the Mesh file to specify which vertex has what UV value as shown in image below.
svertex structure for writing and reading Binary Mesh file.
Vertex shader to accept and output the UVs.
This output UV value from vertex is interpolated and passed in fragment shader.
The fragment shader samples the pixel on the texture and sets it as final color for that pixel.

Creating TextureBuilder:
The builder pretty much takes in image files and converts and outputs it to a .dds file. During runtime this .dds file is set into DirectX before Drawcall by calling using SetTexture method. The below PIX output show the SetTexture call before DrawIndexedPrimitive. The texture being applied in my game is also showed in the right window.

Final Output of the game:
Two different textures are applied to two different Meshes in the game.

Misc:
If you are curious, form the PIX output, as to what MIP 0, MIP 1, MIP 2 etc are, in the details of texture tab, read on. Each of these are called MIP levels, which is the set of pre-calculated copies of same texture in different sizes. Each copy is half the width and height of the previous copy. The more MIP level you go, more pixelated they look. Below images show MIP 2 and MIP 3.
MIP 2:

MIP 3:

Why do we need them ?
When a texture is rendered on the surface of an object, the MIP level that corresponds most closely to the screen-space area of the textured surface is automatically chosen. This means that the graphics hardware doesn't have to filter oversized textures to maintain consistent visual quality. Although the memory cost of storing the MIP levels is about 33 percent more than that of the original texture alone, the performance and image-quality gains justify it.
Time Spent:
Creating TextureBuilder: 1hr
Modifying MeshBuilder, VertexShader: 2hr
Loading texture in game: 1hr
Write-up: 2hr
Total: 6hr
![Flappy Bird clone ! [Using my own C++ Game Engine]](https://static.wixstatic.com/media/5ab37f_6f5eaa61ba744460bf8bbc86ef50cc47.png/v1/fill/w_1035,h_844,fp_0.50_0.50,q_35,blur_30,enc_avif,quality_auto/5ab37f_6f5eaa61ba744460bf8bbc86ef50cc47.png)
![Flappy Bird clone ! [Using my own C++ Game Engine]](https://static.wixstatic.com/media/5ab37f_6f5eaa61ba744460bf8bbc86ef50cc47.png/v1/fill/w_152,h_124,fp_0.50_0.50,q_95,enc_avif,quality_auto/5ab37f_6f5eaa61ba744460bf8bbc86ef50cc47.png)
Comments